DESIGN GRADE 12 PAPER 2 QUESTIONS - NSC PAST PAPERS AND MEMOS SEPTEMBER 2017
Share via Whatsapp Join our WhatsApp Group Join our Telegram GroupDESIGN
GRADE 12
PAPER 2
NSC PAST PAPERS AND MEMOS
SEPTEMBER 2017
INSTRUCTIONS TO THE TEACHER
- This practical paper should be given to the learners THREE WEEKS BEFORE THE END OF TERM 2 so that they can receive guidance with regard to the brief/theme selection and can start with the Visual Journal Process (TOPIC 1) during the June/July school holiday.
- This practical examination paper must be done as the TERM 3 PRACTICAL TASK (PAT 3). It is recommended that teachers request their schools to schedule 12–24 hours over a number of days before or during the Trial examination for completion of the Final Product (TOPIC 2) to familiarise learners with timed and controlled practical examination conditions.
- Time allocation:
- Visual Journal Process (TOPIC 1):
Preparation to be done during the June/July school holiday and at school during TERM 3. - Final Product (TOPIC 2):
Completed only at school during TERM 3 for an estimated time of 12–24 hours and only once the Visual Journal Process (TOPIC 1) has been completed.
- Visual Journal Process (TOPIC 1):
- This practical examination consists of one paper with two optional briefs/themes. Learners must choose ONE of the two briefs/themes.
It is required that the learner complies with the followingTWO parts of this question paper:- The Examination Visual Journal (TOPIC 1) [50 marks]
- The Examination Final Product (TOPIC 2) [50 marks]
TOTAL: 100 MARKS
- The learner should choose ONE of the following design categories:
- Visual Communication/Information Design and Digital Design
- Surface Design and Two-dimensional Craft Design
- Product Design and Three-dimensional Craft Design
- Environmental Design
GRADE 12 TERM PLANNER
- - - Calendar to assist in the planning of practical dates and times:
 |  |
 |  |
Important term dates:
- Receive Design P2 Practical: 05 – 09 June 2017
- Schools close (Term 2): 30 June 2017
- Schools open (Term 3): 24 July 2017
- Trial Practical Examination dates: ____________________(fill in)
- Trial Examinations begin: ____________________(fill in)
- Trial Examination Theory date: ____________________(fill in)
- Schools close (Term 3): 29 September 2017
**NEW 2017
THE IMPORTANCE OF THE TERM 1 AND TERM 2 RESEARCH TASKS
This is also referred to as ‘Design in a Business Context’.
There is NO TERM 3 research task. Learners are allowed to re-submit their TERM 1 and TERM 2 Research Tasks for a re-mark during TERM 3. This is very important as it contributes towards 20% of the end-of-year final exhibition mark in November.
Learners must combine their TERM 1 and TERM 2 research tasks into one document towards their end-of-year final exhibition mark and this must be handed to the teacher at the end of Term 3.
The end-of-year final exhibition
The end-of-year final exhibition mark will be compiled in the following way:
Visual Journal Process (TOPIC 1):
- Term 1 – (40) Visual journal/sourcebook
- Term 2 – (40) Visual journal/sourcebook
- Term 3 – (50) Visual journal/sourcebook
TOTAL: 130
Final Product (TOPIC 2):
- Term 1 – (50) Final Product
- Term 2 – (50) Final Product
- Term 3 – (50) Final Product
TOTAL: 150
These totals (130 + 150 = 280) are converted to 80% of the end-of-year final exhibition mark.
The TERM 1 and TERM 2 Research Tasks (10 + 10) are added to the 80 for a combined TOTAL exhibition mark of 100.
Learners and teachers need to be aware of the important value and weighting of the two research tasks. Research tasks marks (10 + 10) are added as raw marks to the compressed Visual Journal Process and Final Product marks.
**NEW 2017
THE FORMAT OF THE RESEARCH TASKS
It is important to integrate the TERM 1 and TERM 2 research tasks with the practical brief/theme as far as possible. This is up to the discretion of the teacher and may be related to the specific practical discipline that is being taught.
The research tasks should be seen as part of the Visual Journal Process (TOPIC 1) and it is suggested that it should consist of:
- A topic-related and presentable front and back cover;
- A content page;
- An introduction;
- Content (4–8 pages);
- A conclusion;
- A detailed bibliography (e.g. Title underlined; author(s) in brackets; publisher; publishing date; web link, blog + date, etc.) and
- Labels to accompany all visual material. (title; materials used; name of designer; country in brackets; date).
The final weighting of each research task must be converted to a total of 10 marks each.
* Source: CAPS Document
INSTRUCTIONS FOR 2017
INSTRUCTIONS TO THE LEARNER: VISUAL JOURNAL PROCESS
This examination booklet refers to two main topics:
- Visual Journal Process (TOPIC 1) and the
- Final Product (TOPIC 2)
The visual journal (TOPIC 1) has the same weighting as the final product so spend an equal amount of time on both – 50 marks for the visual journal and 50 marks for the final product.
- The cover page only of the brief/theme you choose must be cut out and pasted in your visual journal at the start.
- Concept: The learner is to clearly indicate their intention/concept through brainstorming, miniature sketches and/or a written essay (rationale).
- Reference material: Explore as many different options as you research and collect reference material for your theme in the form of life-drawings, original photography, images from magazines and newspapers, etc. These must be creatively presented and displayed in your visual journal so that you can show your understanding of the value of layout and design in your visual journal (Presentation).
- Your reference material may be in a collage format – this format is not essential, however.
- Remember that your reference material must have additional accompanying notes or comments to further explain your thinking process and make clear your intentions.
- Drawing: Your visual journal must show evidence of drawings based on your reference material. It is important that you personalise these by re drawing them and creating original designs. Direct copying (plagiarism) of an image or design that is not your own will be heavily penalised. Extreme importance is placed on the process of transforming your reference material.
- You are required to develop a variety of compositional rough drawings before you complete a drawing of what your final product will look like.
- A final A3 drawing of what your final product will look like must be presented at the end of your visual journal. It is recommended that this is a pencil tonal drawing or a full-colour version. This final drawing is there to improve your drawing mark if your drawing throughout your visual journal is weak.
Important to remember:
In your visual journal there must be a clear documented journey from the start of your brainstorm/essay to a completed final drawing! No steps must be left out.
Design in context:
- Presentation: It is required that you present your design in context. What this means is that you must show how your final product functions in a ‘life-like’ space/environment.
This is especially important in the area of Two-Dimensional Surface Design (textile design, gift-wrap, mosaic, wall paper, beadwork or any ‘flat’ design) and Three-Dimensional Product Design (basketry, ceramics, furniture, jewellery, wirework, fashion or any other three-dimensional design). - This must be shown in your visual journal through drawing/collage/ photography/digital manipulation or incorporated within your final product (TOPIC 2).
Suggestions for design in context may include an:
- Interior setting such as the inside of a room in a home, office or any commercial space;
- An exterior environment on a building or in a landscape;
- On printed media such as a newspapers, magazines, billboards, etc.
- On an item of clothing, furniture or linen or;
- Physically interacting with a person in some way.
Guidelines for three-dimensional product designs
- If you design a three-dimensional product, orthographic diagrams (front view, top view, side view) as well as a final mock-up drawing must be present in your visual journal.
- Detailed measurements must be used to indicate the final scale. Assembly instructions must also be described.
- You must explain your choice of construction material(s) (wood, metal, plastic, wire, paper, etc.) for your final product and explain how the properties of the your chosen material (strength, hardness, toughness, flexibility, corrosion resistance, waterproofing, etc.) supports and improves the functionality of your product.
GUIDELINES 2017
INSTRUCTIONS TO THE LEARNER: FINAL PRODUCT
- Your Visual Journal process (TOPIC 1) work must be completed before the start of your Final Product (TOPIC 2).
- Your teacher may not assist you in any way with the production of your final design and will strongly encourage you to make your own decisions regarding your final processes.
- Your final product must show evidence of 12–24 hours of work. Your teacher must make sure that there is enough time for you to complete your final product in the time allocated.
- Your final product may NOT be done at home and may NOT leave the classroom. Time management is important.
- You must show an advanced degree of technical skill in the medium (drawing; painting; printing; pottery etc.) that you choose. It is therefore advisable that you produce a design in the design discipline that you have studied using the medium that you are skilled at.
- If you produce a two-dimensional product (poster; CD cover; book jacket etc.) it MUST be slightly larger than A3 in size. The size of a two- or three dimensional design can, however, depend on the function of the object being made.
- If your final product is a printed digital image there must be evidence of the original drawing(s)/designs(s) in your visual journal. Your original designs must be scanned or photographed for your printed digital image and must be present at your end-of-year final exhibition.
- Any two- or three-dimensional designs based merely on craft processes like decoupage, etc. for decorative purposes will be penalised. Craft processes may be used to create an original product. Your final product must show sufficient skill in technique and a progression of design skills you have developed from Grade 10.
MARKING RUBRIC/GUIDELINES:
The rubric below is the suggested marking rubric that teachers may make use of for the marking of the Visual Journal Process (TOPIC 1) and the Final Product (TOPIC 2).
This is to ensure standardisation with regard to marking across all schools in the Eastern Cape Province. This must be pasted at the end of the visual journal.
- - - - - - - - - - - - - - - - - - - - - - - - - - - - - - - - - - - - - - - - - - - - - - - - - - - - - - - - - - - - -
SEPTEMBER P2 PRACTICAL – PAT 3
VISUAL JOURNAL PROCESS (TOPIC 1)
CRITERIA | ||
Expression of intention and rationale: (Concepts/Creativity) Thought processes; Pushing the boundaries of design; Critical and analytical thinking; Idea generation | 10 | |
Evidence of research: Experimentation and exploration of source/inspirational material; Investigation | 10 | |
Technical ability: Skills, execution, experimentation and exploration of media. | 10 | |
Evidence of detailed planning and presentation: Showing all the steps and planning towards a final design from the start, to a completed final mock-up; Problem-solving | 20 | |
TOTAL: | 50 | |
FINAL PRODUCT (TOPIC 2)
CRITERIA | ||
Creativity/Originality/Interpretation in terms of the concept, function and solutions that are relevant to the brief. Does it communicate effectively? Is the product successful/marketable/contemporary/ relevant/smart/on trend? | 20 | |
Evidence of design involvement: Interpretation and appropriate use of the chosen design elements and principles. | 10 | |
Technique and craftsmanship: Method/Making; Competence in chosen materials and techniques | 10 | |
Professional presentation and time management (12–24 HOURS) Is it complete? Is it neat? Are there still areas that need work? Does it looked rushed and untidy? | 10 | |
TOTAL: | 50 | |
QUESTIONS
BRIEF/THEME 1: ICONIC SOUTH AFRICAN BRANDS
As South Africa’s Heritage Day approaches on 24 September, take a moment to think fondly of those iconic brands that contribute to our heritage and who we are, unique in this world and proudly South African.
The influence that these brands exert on consumer behaviour means they have also become part of the social history of the times, reflecting the fashion, art, literature, technology, health, sport and social norms of the day.
The early days of branding in South Africa date back more than 150 years to a number of iconic brands that form very much a part of the branding scene today. Most of us will remember these brands as part of our childhood, forming part of our life memories, in a way that is so embedded that when we think chutney we think Mrs Balls, or custard Ultramel or tomato sauce All Gold.
Take a few minutes to think about what these brands mean to you and why? Some well-known iconic South African brands include: Black Cat, Koo, Grandpa, Lucky Star, Bakers, Castle Lager, Chappies, NikNaks and the Spur and Nando’s franchises.
What other iconic South African brands can you think of?
YOUR TASK:
- Create a design that is inspired by an iconic South African brand. Your final product must reflect the brand’s physical characteristics and elements (colours, shapes, textures, etc.)
- Identify the USP of the brand. The USP (Unique selling point) is the one factor that differentiates the product from its competitors, such as cost, quality, luxury, safety or the first-ever product of its kind. It may be linked to a sensory experience such as taste or an emotive quality such as ‘love’ or ‘happiness’. A USP could be thought of as ‘what you have that competitors don't.’ Create a product that embodies the core values and USP of an iconic South African brand.
- Re-design an iconic South African brand without losing the elements that makes its distinctive.
NOTE: You may combine two of the above tasks with each other.
 |
| ICONIC SOUTH AFRICAN BRANDS: |
 |
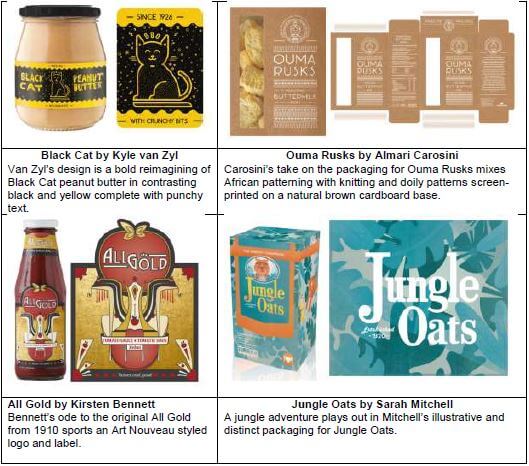 |
| [Source: http://10and5.com/2016/03/18/7-iconic-south-african-brands-get-reimagined/] |
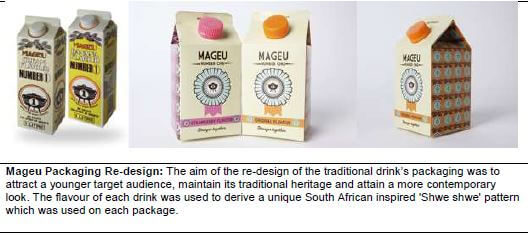 |
| [Source: https://www.behance.net/gallery/4345063/Mageu-Package-Re-design] |
BRIEF/THEME 2: CLEAN ENERGY IDEAS

There are many natural energy sources that can be used to provide a source of clean and renewable electricity or even used for other purposes such as providing heating for your home or business. The three main sources of natural energy are the sun, wind and water.
YOUR TASK:
Create a design that celebrates the earth’s natural energy resources.
1. SOLAR ENERGY SOURCE
The sun provides a source of energy to the earth in the form of solar radiation. We can use this solar energy source to not only generate electricity but to also heat water. The main advantage of this type of energy source is that the equipment required to convert the sun’s energy into electricity or hot water supply is through the use of solar panels which results in a reduction or even elimination of energy bills in some cases for homes or businesses.
Solar energy is not only sustainable, it is renewable and this means that we will never run out of it. Another advantage is that it is a silent producer of energy and during operation electricity power plants produces zero emission.
EXAMPLES OF PRODUCT DESIGN AND THREE-DIMENSIONAL CRAFT DESIGN:
|
Sunfire Solutions: South Africa: SunFire Solutions is aimed at assisting Africans to integrate solar cookers into the social, environmental and cultural fabric of life. Southern Africa enjoys the least access to grid electricity of any region on earth. |

2. WIND ENERGY SOURCE
Both industrial and home wind turbines can be used to provide a source of renewable electricity. Industrial wind turbines are mostly found in coastal areas, open plain and gaps in mountains where the wind is reliable, strong and steady. Because good wind resources are often found in remote and/or economically disadvantaged areas, wind power provides steady and significant revenue to rural landowners, farmers, and communities. The turbines occupy little surface area, leaving land open for farming, housing, and other uses.
The problem with renewable wind energy however, is however the relatively low output of electricity you could receive depending on your location. Another disadvantage of wind energy is that with larger wind turbines comes an increase in noise pollution and high maintenance costs.
EXAMPLE OF ENVIRONMENTAL DESIGN:
 |
Metrowind Wind Farm – Eastern Cape, South Africa: MetroWind’s Van Stadens Wind Farm is a world-class project under development in the Nelson Mandela Bay Municipality in the Eastern Cape Province. The R550 million renewable energy project, one of the first in South Africa, is an identified strategic economic development project in the region. |
3. WATER ENERGY SOURCE
Water contained on the earth can be used in a variety of ways to generate electricity. Tides and waves of the sea can be used to generate electricity whilst rivers can be held back by a hydroelectric dam to provide power to the masses. A method of harnessing the seas natural energy source and increasing in popularity over recent years, is tidal power. This highly renewable energy source has a huge force behind it and is able to drive water turbines situated around 100 meters out to sea as the tides go in and out.
Wave energy is similar to tidal energy in that it has a huge source of energy behind it. Long cylinder containers can be linked together and anchored to the earth close to a shoreline that has significant levels of wave activity. These cylinders have been designed to generate electricity from the rocking motion that the waves place on the wave energy system.
EXAMPLE OF ENVIRONMENTAL DESIGN:
 | |
The Gariep Dam – Norvalsport, Eastern Cape/Free State: The Gariep Dam forms part of the Orange River Development Scheme and is the largest hydro-electric dam in the country. Electricity from the dam is fed into the Eskom network at the Hydra Distribution Station near De Aar, which is one of the distribution stations fed by the transmission lines linking the Western Cape with the power stations in Mpumalanga. | |
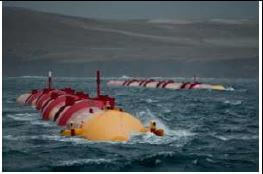 | 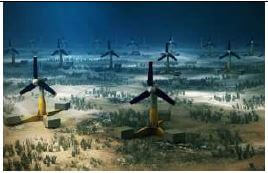 |
Pelamis Wave Power, Portugal: The Pelamis is an offshore wave energy converter that uses the motion of waves to generate electricity. The power is transmitted to shore using standard subsea cables. | La Rance Barrage Tidal Power Station, France: Tidal turbines are very much like underwater windmills except the rotors are driven by consistent, fast-moving currents producing electricity. |
EXAMPLES OF VISUAL COMMUNICATION/INFORMATION DESIGN:
ART DECO CELEBRATES THE SUN
EXAMPLES OF VISUAL COMMUNICATION/INFORMATION DESIGN: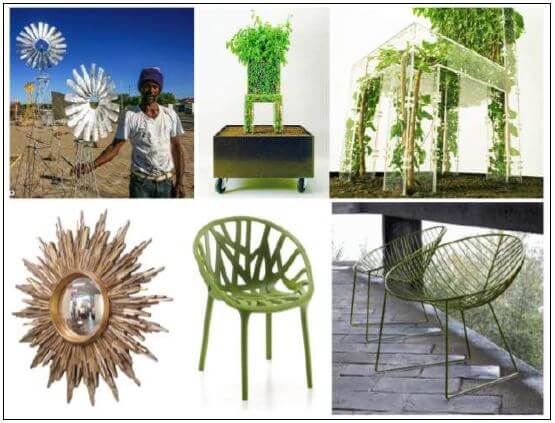
TOTAL: 100